

Hi all. So you tried Pop OS! 20.04 (https://bln364.com/how-to-try-system-76s-pop-os-on-windows-10-laptop/) and now you want to install Pop OS! alongside Windows 10. This will show you how to dual boot Pop OS! and Windows 10.
Short overview:
- Download Pop!_OS 20.04
- Create Bootable USB stick
- Shrink Windows 10 partition
- Create Pop OS! partition
- Install Pop OS!
- Configure GRUB
And I must add. Please be careful with this process. Formatting the wrong partition can cause you to lose all your data. Please be careful, back up your data and do next steps on your own risk.
If you are maybe not ready to install Linux on you hard drive maybe you can try Linux inside Virtual Machine. If you are interested in something like that please check out my first online Udemy Course Virtualization with VirtualBox.

Also check out my other post on how easy it is to dual boot Ubuntu and Windows 10 in 2022 in next post https://blnlabs.com/dual-boot-ubuntu-and-windows-10-in-2022/
What is Dual Boot?
So, what is Dual boot Pop OS? What is good to know before we start. When we say dual boot we are saying that on our PC and/or laptop there are two Operating Systems installed. It can be Windows and Linux, Linux and Linux, Windows and Mac in some cases, and so on. Basically If you can install an OS on your machine, you can dual boot it with Another OS that can run on your machine.
To get more detailed with this we need to know a bit about the boot process, and how does our PC know to start our OS.
Check out my other post about the best 14-inch laptop with dual NVMe SSDs at link.
At the beginning PC doesn’t know anything about its hard drives, and the first thing is to perform something that is called Power On Self-Test or POST. Now, the firmware searches somewhere to find the entry point for your OS and that information can be found in Master Boot Record MBR for Legacy Boot or in GUID Partition Table (GPT) for UEFI boot. This is a bit too technical but don’t worry you only need to know that there is info where your OS is stored, and PC but need to have this info in order to boot your PC.
In these two places firmware will find the location of your installed OS and then give control to your OS.
But then how are we dual booting and as always there are a couple of ways (freedom :)).
If you are adding the second drive to your PC for the second OS, you can simply do the next thing. Power of your PC and unplug your first drive and then plug in the second drive and install a second OS on that drive. After install, simply plug back the first drive and you are done. Now, at the boot up of your PC you need to go inside the UEFI or BIOS and just choose the drive to boot from. This is not the optimal way, but if you don’t switch between the OSes frequently, maybe this solution can make your life easier because you don’t have to modify or change MBR or GPT.
The other way is to use GRUB, which is done in this post. Just to say there are a lot of ways to do dual boot, but in this post I will cover just those two. What is GRUB?
“GNU GRUB is a Multiboot boot loader. It was derived from GRUB, the GRand Unified Bootloader, which was originally designed and implemented by Erich Stefan Boleyn. Briefly, a boot loader is the first software program that runs when a computer starts. It is responsible for loading and transferring control to the operating system.” by WiKi.
So we can install GRUB in part of our hard drive and then point MBR or GPT to it. That instead of our OS grub will control, create GUI for us, scan drives for installed OSes and then give us a choice which OS we want to use. Below you can see a couple of GRUB examples that are themed by Linux distros Ubuntu and Manjaro.

The Grub way (or with programs like GRUB) is the only way if you are dual booting on the one hard drive. If you have only a hard drive you will need to install your second OS to separate the partition that your first OS and then install GRUB. In a lot of Linux distributions Grub is installed by default, but for some reason GRUB is not installed with Pop!_OS from the box. So, don’t worry if you don’t see windows after you installed Pop!_OS, maybe you just need to install GRUB in order to Dual boot Pop OS.
Intro to Pop!_OS
Pop!_Os is Linux distribution create and maintained by System76 and it’s based on other Linux distro Ubuntu. It’s very good for beginners because it’s easy to setup and start using it.
Download Pop!_OS 20.04
In order to download Pop!_Os go to system76 site and select download https://pop.system76.com/.

Now, we have couple of options in order to download Pop!_Os. There are two versions for Pop!_Os, normal release and something that is called LTS (Long Term Support). This follows the release cycle of Ubuntu, that is show below.

Basically, there should be new release of OS every 6 months, but every 2 years there is major release that is called LTS and that version will get much longer official support then normal release. Advantage for normal release is, if it’s after roiling release, that it might sooner have support for new hardware and/or some new feature, but because that it can be a bit unstable. If you are downloading Pop!_Os for the first time and trying Linux for the first time, maybe stick with LTS version at first.

When we have LTS selected now we can download Pop!_Os with NVidia or open source drivers. What this means. If you have NVidia graphics card download Pop!_Os LTS (NVIDIA) and this will download OS with NVidia drivers preinstalled. If you have AMD or Inter integrated graphics download Pop!_Os LTS.
Now, we have .ISO file with our OS. We need to create bootable USB or CD/DVD form our .ISO file and for that there is good program called balenaEtcher.
Create Bootable USB stick (Live USB)
In this post I will create bootable USB flash drive (Live USB) using balenaEtcher, but first go to https://www.balena.io/etcher/, download and install balena.

In order to create Live USB with Pop!_Os (on Windows) we need:
- Installed BalenaEtcher (done)
- Downloaded Pop!_OS ISO file (done)
- USB flash drive with at least 8GB
Insert USB stick into your PC and start balenaEtcher. Again, be careful. Back up your data from USB flash drive before this. USB Drive will be formatted for new OS and your current data will be gone.
Select Pop!_Os ISO file in section Flash from file and your USB flash drive at Select Drive section. Then press Flash.

Shrink Windows 10 partition
Now, you have a bootable USB stick, and you need to boot from it. If you have a problem with booting from USB stick check out my blog for solution (https://bln364.com/how-to-try-system-76s-pop-os-on-windows-10-laptop/).


On windows shown above we select do we want to continue with Demo Mode, or do we want to install Pop OS! 20.04 on your hard disk. I’m using for this example 120GB internal SSD disk (Kingston 120GB A400). If we want to install Pop OS! on your hard disk in this case select Custom (Advanced) install and you will get next window.

Currently, we have only Windows 10 installed on our hard disk, so we have only two partitions, Windows Recovery and the main Windows NTFS partition. Next thing to do is to shrink our existing partition and create space for Linux partitions. Two do that we need to press Modify Partitions…
This will open Gparted Linux partition tool that will look something like this. In the top right corner important thing is to set your hard disk. In this example, I have selected /dev/sda.

When we have selected the right hard disk, we need to unmount our partitions. This will allow us to change existing partitions.

Then we need to resize our existing partition. Let us use half a space for Windows and half for Linux.


Create Pop OS! partition
Now, we can create 3 partitions for Pop OS!, and that are root, boot, and swap. We can do that in the next way.


For this blog, I’m installing Pop OS! on a very old HP Compaq nc6400 laptop, so I’m setting the size of my /swap partition to 2GB, and 512MB for /boot. Everything else will be /root partition.
After creating and formatting new 3 partitions, click Apply All Operations and when all is done close Gparted. Now you should see updated hard disk preview with new partitions like on the image below.

Now we need to use Pop OS! installer to define which partition will be allocated for Pop OS!.


Install Pop OS!
Now we can you press Erase and Install and wait for Pop OS! to be installed.


Configure GRUB
And we have Pop OS! installed beside our Windows 10. We can simply reboot and remove USB stick for PC and enjoy in two compliantly different Operating systems.
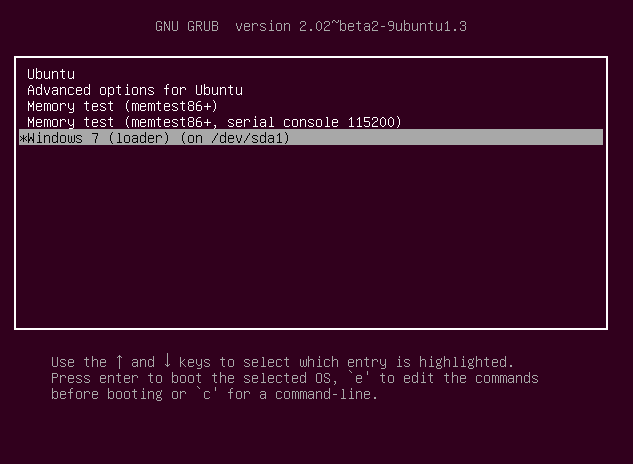
Now laptop boots directly to Pop OS!. This was very strange for me, because, usually, on other Linux distributions GRUB (Linux boot loader) will be automatically setup when installing and after powering on you will be greeted with something like this:

In this case, GRUB was nowhere to be seen so we can not say that we have Dual boot Pop OS! and Windows 10 system? We went straight to Pop OS!. Windows 10 is still installed but we need to configure GRUB to know where to find Pop OS! and where to find Windows 10.
To update and setup GRUB lets first update the hole system. That can be done with two simple commands from terminal:
sudo apt update
sudo apt upgrade
Now we need to install one packet, os-prober with:
sudo apt install os-prober
We need this packet because without it GRUB will not be able to find Windows 10 partition.
sudo os-prober
Result from running the os-prober should be something like this:
/dev/sda1:Windows 10:Windows:chain
Finally we can run:
sudo update-grub
to update and activate GRUB on Pop OS!.
And this is it. Now after powering on you will be greeted with GRUB screen in which you can select Pop OS! or Windows 10.

Final words
This was a fun project for me and it brings life in my old laptop. Pop OS! 20.04 isn’t maybe the best option for low-end hardware, or there are maybe better Linux Distribution for low-end hardware, but said that it runs better than Windows 10.
Process of installing Pop OS! alongside Windows 10 went pretty much smooth, if we don’t count GRUB part, what was very strange for me.
Let finish. Did you find something missing in this tutorial? How do you like Pop OS!? Did you manage to Dual boot Pop OS!? Please comment down below and check out my other post at https://bln364.com/
Check out my other Pop OS 20.04 related posts:


Great tutorial and thanks for taking the time to document this.
Cheers
Frank
Thank you very much for sharing these insights. I have now effectively activated dual boot on my machine.
Hi Blagoje,
Many thanks for you kind post, it saved me a lot of work and trouble booting multiple OSs. Keep the good job! Warm regards from Romania!
Thanks for the tutorial!
Any idea why sudo update-grub returns command not found (in my case). I have windows on a NVMe drive… not sure if that’s the issue.
Here https://support.system76.com/articles/bootloader/ there’s some info but even they use sudo update-grub…
Thanks again for the tutorial and any further assistance!
Cheers,
J
Were you able to fix this?
you need to install grub2-common
sudo apt install grub2-common
this will allow you to use update-grub
Thank you so much for this
I had this same problem. This tutorial got my Grub working. https://jacci.net/linux/pop-os/how-to-install-grub-on-pop-os-20-04/
HI there.
I followed the steps but I am still not getting the GRUB menu, it directly loads into Pop os.
any solution to this?
On my two system, those steps were enough. Check are some command exiting with error.
Are your motherboards boot order set to put grub first?
You can configure boot order in UEFI or BIOS. In my case, I will boot form my only hard drive first. At beginning of that hard drive grub is installed.
Excellent! This greatly helped, especially the restoring GRUB part. thanks!
Hello,
Thank you for the great tutorial
I have a problem with partitions editing because when I go to the “modify partitions” part, the only disk that is shown is the USB drive that I’m using to run Pop OS… Do you have any idea why this happens?
While a great tutorial, I’d recommend not using grub, but instead configuring systemd-boot – add some timeout to it – edit /boot/efi/loader/loader.conf file and add this to the end of the file – “timeout 5” (default is 0, so it always chooses default OS, which would be Pop!_OS, hence the laptop always boots directly to Pop!_OS). You can also add the Windows boot files to the /boot directory (follow this – https://github.com/spxak1/weywot/blob/main/Pop_OS_Dual_Boot.md) and get an option to choose Windows at startup.
Systemd-boot is so much simpler to configure and much much faster than grub, and it’s by default installed with Pop!_OS, meaning you’ll be adding extra packages, when there are already programs that essentially do the same thing.
Thanks for the map! Up and running. If I were to guess the reason for the grub oddities at the end.. Could it be cause the partition wasn’t done with the system EFI section. So therefore we had to adjust it and install it into our new boot partition? Just a thought.. Thanks again!!