
Couple of week ago, I started working on homemade CNC plotter that uses stepper motors form old CD/DVD drives. At some time, controller was implemented and construction was solid, so that was a good time for a test run. But what to print? There are couple of web sites that can generate G code from string, but what if we want to plot some image with CNC plotter . How can we generate G code from an image?
In this post I will try to explain the process that I have found out to be very good in creating G code from an image. I wanted a solution that is free and easy, so the choice came down to open source software. I’m not saying that this is the best way, but until this point, it is the best way I know. So please, if you have any other suggestions, that can make this process easier, comment down bellow.
I’m using Inkscape, an open source vector graphics editor, that is used for image editing. Also, for a long time I wanted to try Linux distribution called Manjaro, so this G code generation is done using this operating system. Let’s start.
To begin with, what is actually G code?
“G-code (also RS-274), which has many variants, is the common name for the most widely used numerical control (NC) programming language. It is used mainly in computer-aided manufacturing to control automated machine tools.
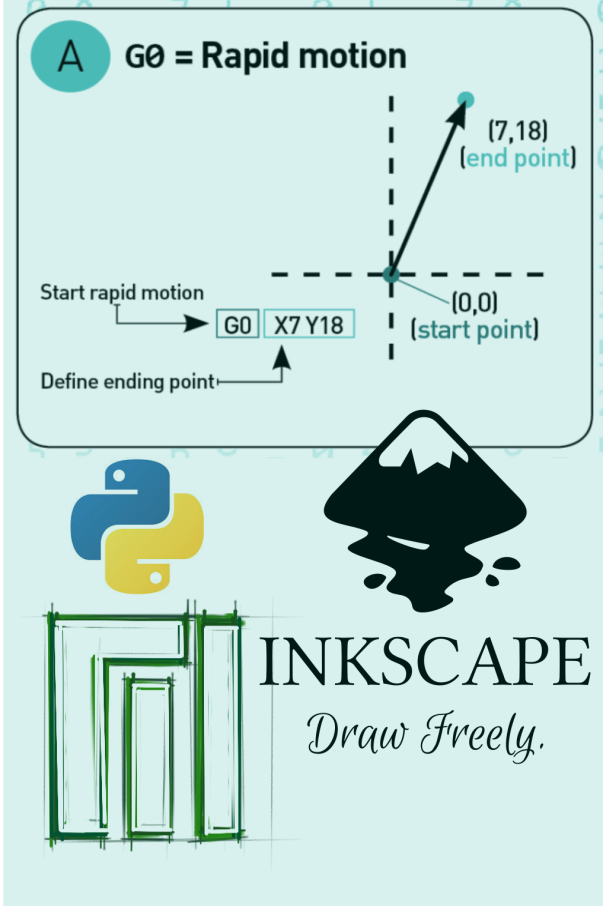
G-code is a language in which people tell computerized machine tools how to make something. The “how” is defined by g-code instructions provided to a machine controller (industrial computer) that tells the motors where to move, how fast to move, and what path to follow.”
from Wikipedia
[table id=2 /]
Now when we have basic understanding of G code, let’s install Inkscape on Manjoro. Open the terminal in Manjaro with keyboard shortcut Ctrl+Alt+T or by pressing F12 if program Yakuake is running in background.
Install Inkscape with next command:
- sudo pacman -Syyu (optional – update system)
- sudo pacman -S inkscape
We have Inkscape now installed on our PC.

After successful installation, go to Inkscape site at https://inkscape.org/ and go to tab Download >> Extensions, to download G code extension for Inkscape. Find GcodePlot extension and download it. To install this extension, copy the downloaded content into Inkscape installation directory. Go into Download directory, unpack zip folder and copy that content to /usr/share/inkscape/extensions/ . After that, we can find option in Save As pop up window to save file as .gcode or 3-axis gcode plotter.

We are ready to start image processing. Let’s chose one image, logo for thunderbird email client, shown bellow. Just drag and drop image to Inkscape window. When that is done, we have an embedded image that we can process.
![]()

Next steps are as followed:
- Set document size – go to File -> Document properties and set document custom width and height.
- Move and Resize Image to fit
- Trace Bitmap – in order to convert color images to G code, we need to lose information about the color. In other words, we need to convert the image to black and white. This can be done with Trace Bitmap (Path->Trace Bitmap…)

- Simplify trace a bit, to ease manufacturing process. Select image and go to Path-> Simplify. With this we have much less traces in our image, but image quality is still pretty much the same.
- Next step is to save image as .gcode file using the extension that is installed in first part of this blog
- Default configuration is used in pop-up window for gcode extension

And that is it. We have .gcode file. But is this the end? No.
G code is a bit different from machine to machine. It is a bit like a language dialect. Language is still the same, but there is some difference. I will run this .gcode file on my homemade CNC plotter, where CNC controller is programmed by me. I have’t implemented, yet, all gcode instructions inside, so for now there are only main functions, like linear movement, pen up, pen down.
Because of that reason I made simple python script called Gcode_BLN.py that will just simplify gcode to dialect that is currently implemented on my CNC controller. As this step is necessary for my CNC controller only, there is no need looking deeper into it.

We can start CNC machine and send G code file. Result is pleasing, maybe just for me. Construction of my CNC machine is, to say a least, not the best, and it needs improvement. There is a lot of wiggle, especially when pen is down and moving. As this is mainly a software test, I reckon that the result is pretty OK, especially for the first try.

We are almost at the end of my first post. I tried to capture my process of generating G code from Image. If you any ideas on a more optimal solution, please let me know.
If you stayed with me this long, thank you. Only with your help I can get better with every post, lose the typing errors and unclear sentences, get suggestions on what I need to fix and do better. So stay with me to witness the progress.
Thank you once again, and see you soon.
Thanks. Very helpful.